
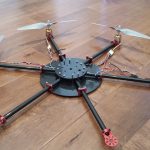
More Motors, More Rotors, More Better
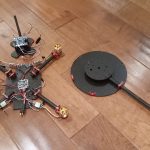
Fore reliability and redundancy reasons, the little hot rod of a quad I previously built is turning into a hexacopter. Some of the electronic bits, and firmware are getting an upgrade as well, but thats part 2.

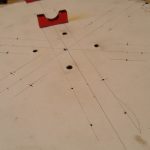
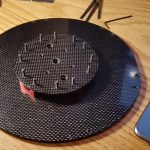
The featured image is a dry fit up of the airframe, and some of the bits and bobs scalped from the quadcopter. Check out the parts list below, and the fabrication photos.
Frame Parts List
PartManufacturerWeight GramsQTYApproximate PriceBuy It Linky
| Top Plate 3mm Carbon fiber 200mm x 300mm |
Arris | N/A | 1 | $32.98 | Glossy – Buy It Matte – Buy It |
| Bottom Plate 2mm Carbon Fiber 200mm x 300mm |
Arris | N/A | 1 | $39.98 | Glossy – Buy It Matte – Buy It |
| Motor Booms 12mmx10mmx500mm Carbon Fiber Tube |
Arris | N/A | 2 | $13.88 ($27.76) |
Buy It |
| Motor Mounts 12mm Aluminum |
Shaluoman | 8g | 2 | $14.99- Amz($29.98) | Buy It |
| Boom Frame Mounts 12mm Aluminum Tube Clamp |
Shaluoman | <8g | 2 | $14.70 ($29.40) |
Buy It |
I mocked up the geometry into usable templates on DesignSpark Mechanical, and then printed them to scale. I then used a water soluble gluestick, to bond my templates to carbon fiber. Out came the mask, because carbon fiber dust and the human airway don’t like each other. Not unless you want the black lung… Cough Cough
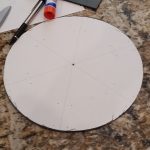
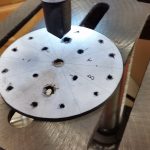
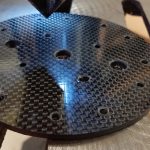
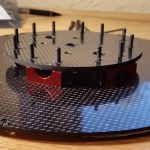
Straight cuts can be done with a fine toothed hacksaw, so long as the edges are protected with tape. Everything else is done with abrasive cut off wheels, and belt sanding. Drilling holes in CF is a pain, slow and steady with a good bit is the only way to get clean holes. Large holes need to be progressive drilled to a larger diameter. After the dry fitting, some holes were ground larger, and all edges chamfered.
Check out Part 2 for the Electronics fitment and assembly of the hexacopter build. Hexacopter Build Part 2
[…] main stages of frame fabrication are in Part 1: http://loyalorderofgoose.com/flying-things/multirotors/hexacopter-build-part-1/ The fiddling with radio, ESC, and cheapo to better 920kv motors Part 2: […]